Battery switch on travel trailer function is crucial for managing your RV’s power. Understanding how this simple switch works can prevent frustrating breakdowns and costly repairs. This guide will walk you through the different types of switches, their locations, how to use them safely, and what to do if things go wrong. We’ll cover everything from basic operation to advanced troubleshooting, making sure you’re confident in handling your travel trailer’s electrical system.
We’ll explore the various types of battery switches, their placement in your RV, and how to correctly identify yours. Learn how to safely connect and disconnect your batteries, avoiding potential hazards like electrical shocks. We’ll also delve into troubleshooting common issues, providing step-by-step solutions for problems like switch failure and blown fuses. Finally, we’ll cover maintenance and replacement, ensuring your battery switch stays in top condition for years to come.
Understanding Battery Switches in Travel Trailers
Knowing how your travel trailer’s battery system works is crucial for reliable power on the road. This section will help you understand the different types of battery switches, their locations, and how to identify them. Properly managing your batteries ensures you’ll always have power for lights, appliances, and other essential systems.
Types of Battery Switches
Travel trailers typically utilize one of two main types of battery switches: a simple on/off switch or a more complex multi-position switch. Simple on/off switches are the most basic, providing a direct connection or disconnection of the battery. Multi-position switches, often called selector switches, offer more control, allowing you to select between different battery banks (like a house battery and a starting battery) or completely isolate the batteries.
Some advanced systems even incorporate a combination of switches and relays for more intricate power management.
Typical Locations of Battery Switches
The location of your battery switch varies depending on the make and model of your travel trailer. However, common locations include: inside a battery compartment (often near the batteries themselves), in a dedicated electrical panel (usually inside the trailer), or even near the entry door for easy access. Some manufacturers may place the switch in less obvious places, such as inside a storage compartment.
Always consult your owner’s manual for the exact location in your specific trailer.
Identifying the Main Battery Switch
Visually identifying your main battery switch is straightforward. Look for a switch with clearly labeled positions like “ON,” “OFF,” “BOTH,” “1,” “2,” or similar designations. The switch will likely be near the battery or the main electrical panel. The switch itself will usually be a fairly robust switch capable of handling the current drawn by your trailer’s systems.
It might be a rocker switch, a rotary switch, or even a more complex switch with multiple positions and indicator lights. If you are unsure, refer to your trailer’s wiring diagram or contact a qualified RV technician.
Comparison of Battery Switch Types
| Feature | Simple On/Off Switch | Multi-Position Switch | Advanced System (Switch & Relays) |
|---|---|---|---|
| Cost | Low | Medium | High |
| Complexity | Simple | Moderate | Complex |
| Functionality | Basic on/off control | Selection between battery banks or isolation | Precise control, often with automatic features |
| Maintenance | Low | Low to Medium | Medium to High |
Function of the Battery Switch: Battery Switch On Travel Trailer Function
The battery switch in your travel trailer is a crucial component for managing your power sources and preventing unwanted battery drain. It acts as a central control point, allowing you to selectively connect and disconnect your house batteries from the trailer’s electrical system. This simple device plays a surprisingly significant role in ensuring your RV’s electrical system functions correctly and efficiently.The primary function of the battery switch is to isolate and connect the house batteries to the trailer’s 12-volt electrical system.
This allows you to power your lights, water pump, refrigerator (if 12V), and other appliances while camping. More importantly, the switch lets you completely disconnect the house batteries from the trailer’s electrical system when not in use. This prevents parasitic drain – the slow, continuous discharge of your batteries even when your trailer isn’t actively using power. Parasitic drain can occur from devices that constantly draw a small amount of power, even when turned off, like clocks or smoke detectors.
Battery Switch Isolation and Connection
The battery switch typically has several positions. A common configuration includes an “Off” position, which completely disconnects the house batteries from the trailer’s system, preventing any drain. A “Both” or “On” position connects both house batteries in parallel, providing the maximum power output. Some switches also offer a “Start” position which connects the batteries to power the starting motor of your vehicle, assuming you have a dual battery setup with a vehicle battery also connected to the switch.
This ensures you always have sufficient power for starting your tow vehicle. The switch achieves this isolation and connection through internal contacts that physically break or make the electrical connection between the batteries and the trailer’s electrical system.
So, you’re planning a trip? Awesome! Don’t forget travel insurance! Seriously, check out aon travel insurance for comprehensive coverage. They’ve got options for everything from lost luggage to medical emergencies. And if you want another opinion before you decide, compare it with aon travel insurance details on this other site; they often have slightly different packages.
Getting the right insurance is key for a worry-free vacation!
Preventing Battery Drain
Leaving your house batteries connected to the trailer’s electrical system while it’s not in use can lead to a completely drained battery when you next want to use the trailer. This is where the “Off” position of the battery switch becomes invaluable. By turning the switch to “Off,” you completely sever the connection, preventing any parasitic drain and ensuring your batteries are ready for use the next time you go camping.
This is particularly important during long periods of storage, preventing the need for frequent battery charging or even battery replacement.
So, you’re planning a trip? Awesome! Before you jet off, remember travel insurance is key. Check out Aon travel insurance for comprehensive coverage. They’ve got options for everything from lost luggage to medical emergencies. And if you want another opinion, Aon travel insurance also offers various plans; comparing both sites is a smart move to find the best fit for your adventure.
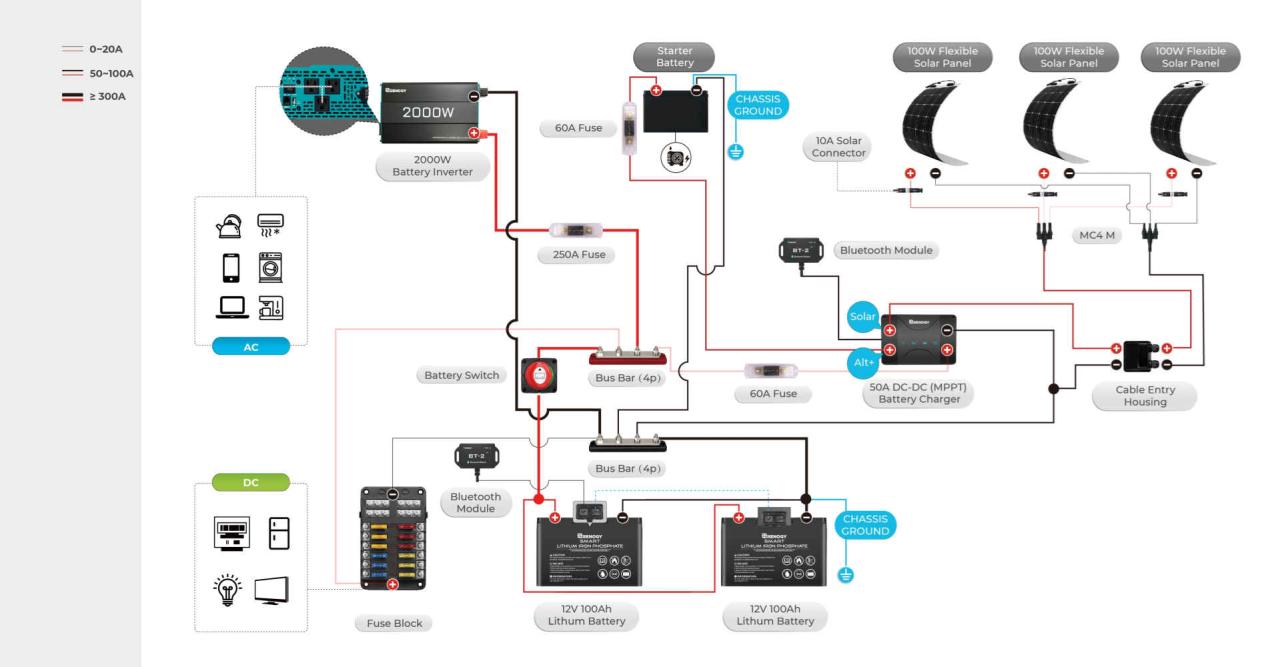
Power Flow Through the Battery Switch
The following flowchart illustrates the power flow in different operational modes of a typical battery switch. Assume we have two house batteries (Battery 1 and Battery 2) and a 12V electrical system in the trailer.[Diagram description: A flowchart showing three main branches labeled “Switch OFF,” “Switch ON (Both),” and “Switch START.” The “Switch OFF” branch shows Battery 1 and Battery 2 disconnected from the 12V trailer system.
The “Switch ON (Both)” branch shows Battery 1 and Battery 2 connected in parallel to the 12V trailer system. The “Switch START” branch (if applicable) shows Battery 1 and Battery 2 connected to the tow vehicle’s starting system.]
Connecting and Disconnecting Batteries
Properly connecting and disconnecting your travel trailer batteries is crucial for safety and preventing damage to your electrical system. Using the battery switch correctly minimizes the risk of shocks, sparks, and battery damage. Always remember to prioritize safety when working with batteries.
Your battery switch acts as a master control, allowing you to isolate your batteries from the trailer’s electrical system. This is essential for preventing battery drain when the trailer isn’t in use and for performing maintenance or repairs. The process involves a simple on/off action, but understanding the correct procedure is paramount.
Battery Connection Procedure
Before connecting, visually inspect the batteries for any signs of damage, such as corrosion on the terminals or cracks in the casing. Clean any corrosion using a wire brush and baking soda solution. Ensure your hands are dry and you’re wearing appropriate safety gear, like gloves.
- Make sure the battery switch is in the “OFF” position.
- Carefully connect the positive (+) cable to the positive terminal of your battery. Make sure the connection is secure and tight.
- Repeat the process for the negative (-) cable and the negative terminal. Again, ensure a tight connection.
- Once both cables are securely connected, carefully turn the battery switch to the “ON” position.
Battery Disconnection Procedure
Disconnecting your batteries is just as important as connecting them correctly. Following these steps will help prevent accidental shorts and damage to your electrical system.
- Turn the battery switch to the “OFF” position. This will disconnect the batteries from the trailer’s electrical system.
- Carefully disconnect the negative (-) cable from the battery’s negative terminal first. This helps prevent accidental shorts.
- Then, disconnect the positive (+) cable from the battery’s positive terminal.
Hazards of Improper Battery Switch Operation
Improper operation of the battery switch can lead to several hazards. Understanding these risks will encourage safe practices.
- Electrical Shocks: Working with batteries without taking proper precautions can result in potentially dangerous electrical shocks.
- Sparks and Fires: Loose connections or incorrect switching can create sparks, potentially igniting flammable materials near the batteries.
- Battery Damage: Incorrect disconnection can lead to reverse polarity, damaging the batteries and the trailer’s electrical system.
- System Damage: Improper switching can cause surges in the electrical system, potentially damaging sensitive electronics.
Safety Precautions
Always prioritize safety when working with batteries and the battery switch. Here’s a list of precautions to observe:
- Wear safety glasses to protect your eyes from potential sparks or acid splashes.
- Wear gloves to protect your hands from corrosion and acid.
- Ensure the area is well-ventilated to avoid inhaling battery fumes.
- Never touch the positive (+) and negative (-) terminals simultaneously. This can cause a short circuit.
- Have a fire extinguisher nearby in case of a fire.
- If you are unsure about any aspect of connecting or disconnecting your batteries, consult a qualified electrician or RV technician.
Maintenance and Replacement
Keeping your travel trailer’s battery switch in top condition is crucial for reliable power. Regular maintenance prevents problems and extends its lifespan, saving you time and money in the long run. Neglecting maintenance can lead to corrosion, poor connections, and ultimately, failure of the switch, leaving you stranded without power.
Battery Switch Maintenance
Regular inspection and cleaning are key to maintaining your battery switch. Look for signs of corrosion on the terminals and the switch itself. Corrosion can impede the flow of electricity and eventually lead to failure. A simple cleaning with a wire brush and baking soda paste can remove most corrosion. After cleaning, apply a dielectric grease to the terminals to prevent future corrosion.
This grease protects the metal from moisture and prevents oxidation. It’s also a good idea to periodically check the tightness of all connections to ensure a secure electrical path.
Replacing a Faulty Battery Switch
If your battery switch fails, replacement is necessary. A faulty switch might manifest as intermittent power, complete power loss, or even overheating. Replacing it is a relatively straightforward process, but safety precautions are essential. Always disconnect the batteries before working on any electrical components.
Tools and Materials for Battery Switch Replacement
Before starting the replacement, gather the necessary tools and materials. You’ll need a new battery switch (ensure it’s the correct amperage for your system), a wrench or socket set to match the switch’s mounting hardware, wire strippers/cutters, a screwdriver (possibly Phillips and flathead), electrical tape, and dielectric grease. Having a multimeter handy to test continuity and voltage is also advisable.
Safety glasses and gloves are recommended for protection.
Step-by-Step Battery Switch Replacement
- Disconnect the Batteries: Describe Image 1: A clear shot of the battery terminals with the positive and negative cables clearly labeled. The image shows the process of disconnecting the cables, with a wrench being used to loosen the terminal clamps. Begin by disconnecting both the positive (+) and negative (-) battery cables from your batteries. This is the most crucial safety step to prevent electrical shocks.
- Remove the Old Switch: Describe Image 2: A close-up view of the old battery switch mounted in its location. The image shows the various wire connections to the switch, with labels indicating which wire goes to which terminal. Carefully remove the old battery switch from its mounting location. Note the wiring configuration before disconnecting any wires. Take pictures or make a detailed diagram if needed.
- Prepare the New Switch: Describe Image 3: The new battery switch is shown, next to a diagram or a clear labeling of the terminals. This shows which terminals correspond to the batteries and which correspond to the trailer’s electrical system. Examine the new switch and compare its terminals to the wiring diagram you created or photographed. Make sure you understand the function of each terminal.
- Wire the New Switch: Describe Image 4: A detailed view of the process of connecting the wires to the new battery switch. The image shows the wires being carefully stripped, and then securely attached to the terminals, with the correct color-coding or labeling maintained. Carefully connect the wires to the corresponding terminals on the new switch, matching the wiring configuration of the old switch.
Ensure the connections are secure and use electrical tape to insulate any exposed wires.
- Mount the New Switch: Describe Image 5: The new battery switch is shown securely mounted in its place. The image emphasizes the neat and organized wiring. Securely mount the new switch in its designated location. Tighten all mounting hardware.
- Reconnect the Batteries and Test: Describe Image 6: The batteries are shown reconnected, and a multimeter is being used to test the voltage at various points in the system. Reconnect the positive (+) and negative (-) battery cables to the batteries. Use your multimeter to test the voltage at various points in your system to ensure everything is working correctly. Check all your trailer’s electrical appliances to confirm functionality.
Different Battery Configurations
Choosing the right battery setup for your travel trailer is crucial for reliable power. The options range from a single battery for basic needs to multiple batteries for extended off-grid use. Understanding the differences will help you make an informed decision based on your power consumption and camping style.Different battery configurations impact both your power capacity and how your battery switch functions.
The switch itself simply acts as an on/off mechanism for the batteries, allowing you to isolate them from the trailer’s electrical system. However, the number and type of batteries connected to the switch directly determine how much power is available and for how long.
Single Battery Systems
A single battery system is the simplest setup, typically using a Group 24 or Group 27 deep-cycle battery. This is suitable for trailers with minimal power demands, perhaps those used for short trips or primarily as a basecamp with access to shore power. The battery switch in this configuration simply connects or disconnects the single battery from the trailer’s electrical system.
A single battery’s limited capacity means you’ll need to frequently recharge it, ideally via shore power or a generator.
Dual Battery Systems, Battery switch on travel trailer function
Dual battery systems offer significantly increased capacity. They commonly use two identical deep-cycle batteries, often Group 24 or Group 27, wired in parallel to increase amperage (amp-hour capacity) or in series to increase voltage. Wiring in parallel doubles the amp-hour capacity, while wiring in series doubles the voltage. Parallel wiring is the more common setup for travel trailers.
The battery switch in this case controls both batteries simultaneously, allowing you to easily disconnect both from the trailer’s electrical system for storage or maintenance.
Group 24 vs. Group 27 Batteries
Group 24 and Group 27 batteries are common choices for travel trailers. Group 27 batteries are physically larger and have a higher amp-hour capacity than Group 24 batteries, meaning they can provide power for longer periods. The choice depends on the available space in your trailer and your power needs. Both types will function similarly with a battery switch; the switch simply connects or disconnects the selected battery (or batteries) from the system.
Battery Configuration Advantages and Disadvantages
The choice of battery configuration involves weighing several factors. Here’s a summary:
The following table summarizes the advantages and disadvantages of different battery configurations:
| Configuration | Advantages | Disadvantages |
|---|---|---|
| Single Battery (Group 24/27) | Simple, inexpensive | Limited power capacity, frequent recharging needed |
| Dual Battery (Group 24/27, Parallel) | Increased power capacity, longer run time | Higher initial cost, more space required |
| Dual Battery (Group 27, Parallel) | Highest power capacity among options listed, longest run time | Highest initial cost, most space required |
Mastering your travel trailer’s battery switch is key to a smooth and enjoyable RV experience. By understanding its function, practicing safe operation, and knowing how to troubleshoot common problems, you’ll be prepared for any situation. Remember, regular maintenance and prompt attention to any issues will prolong the life of your battery switch and keep your RV running smoothly. So, get familiar with your switch, and hit the road with confidence!
Expert Answers
What size fuses should I use with my battery switch?
The correct fuse size depends on the amperage rating of your battery switch and wiring. Check your switch and wiring for the correct amperage rating and select a fuse that matches or is slightly higher.
How often should I clean my battery switch?
Inspect your battery switch at least once a year and clean the terminals with a wire brush to remove corrosion. This will help ensure proper electrical conductivity.
My battery switch is stuck. What should I do?
Try using a lubricant like WD-40 on the switch mechanism. If it’s still stuck, you may need to replace the switch. If you’re uncomfortable doing this yourself, consult an RV technician.
Can I use a different type of battery switch than what came with my trailer?
It’s generally recommended to use a switch with the same amperage rating and features as the original. Using an incompatible switch could damage your electrical system or create safety hazards. Consult an RV specialist for guidance.
